Another milestone on the D&H!
Today I completed another milestone on the D&H.
I have now completed the light installation.
The layout now has 11 x 4ft T5 fluro's, 12 x 2ft T5 Fluro's and no less than 27 x T8 4ft fluro's.
The layout is now basking in the light and it is AWESOME!.
I have also been working on mounting the 28 Loconet attached devices that will drive the turnouts, manage the block detection and drive the signals for the layout.
I have been mounting the modules on pre painted 6mm MDF and terminating the boards on screw terminals for easy install under the layout.
I had planed on building the staging, however, I figured to save some time and pain in terms of wiring down the track, I figured I would install the electronic laden control boards around the layout and connect them into the loconet bus, track power bus, accessory bus power before installing the layout decks.
I have not quite finished doing the terminations on the boards, but all the electronics is now mounted and terminal strips are installed. Im about 1/2 way through the terminations.
Here are a few examples. There are 14 control boards in total.

The Delaware & Hudson Rail Road 4th Sub is based on the Delaware & Hudson Railroad in New York state (USA) in the Whitehall area on the old D&H. The layout is N scale and I will use Digitrax DCC to run the layout. I am building the layout with full block signalling close to prototypical to the Delaware & Hudson per the D&H rule book dated 25th April 1948. Please enjoy the progress.
Tuesday, 24 December 2013
Thursday, 12 December 2013
Cork and wiring rough in
Its all in the planing.!
Sometimes, the success of a railroad is all in the planing..
This week, I procured 35 sheets of 3mm cork and 10 sheets of 1.5mm cork that is to be used between the track and the ply base of the layout.
I then set off to my fathers factory where a 20 ton guillotine is available for the rapid slicing of the cork. Unfortunately the blade is not as sharp as it could be and the cut was not as clean as I needed. So, I left a number of sheets at the factory, as the blade is to be replaced in the next week or so to then be cut.
In the mean time, I have been planing the multiple main bus wiring for the track power, the auxiliary device power, Loconet and also the phone system.
This week, I have managed to install the main bus wires for all of the above. I soon found that I needed 40 meters of Loconet cable and similar amounts of wire for the phone, track power and aux power bus.
I have also looked at the requirements to drive all my signals, turnouts and block detection.
I have now planned where all those devices need to be installed around the layout. All 28 devices excluding the DCS100!.. See the plan for what I mean..
In the plan all turnouts are managed via a loconet device, all main line and loop blocks are detected including separate OS sections for each of the turnout interlockings.
There will be 9 power districts (only so that when a short is encountered in a town, the rest of the layout is not effected.) All this will be run from 1 x DCS100.
I will now set about installing the loconet aux devices on timber and pre wiring them with terminal blocks before I install the decks of the layout. Once ready I will install them before screwing down the decks that I have already cut. (to make the install easier!).
Stay tuned for the next update.
Sometimes, the success of a railroad is all in the planing..
This week, I procured 35 sheets of 3mm cork and 10 sheets of 1.5mm cork that is to be used between the track and the ply base of the layout.
I then set off to my fathers factory where a 20 ton guillotine is available for the rapid slicing of the cork. Unfortunately the blade is not as sharp as it could be and the cut was not as clean as I needed. So, I left a number of sheets at the factory, as the blade is to be replaced in the next week or so to then be cut.
In the mean time, I have been planing the multiple main bus wiring for the track power, the auxiliary device power, Loconet and also the phone system.
This week, I have managed to install the main bus wires for all of the above. I soon found that I needed 40 meters of Loconet cable and similar amounts of wire for the phone, track power and aux power bus.
Sorry for the poor pictures.. But you get the idea!
I have also looked at the requirements to drive all my signals, turnouts and block detection.
I have now planned where all those devices need to be installed around the layout. All 28 devices excluding the DCS100!.. See the plan for what I mean..
In the plan all turnouts are managed via a loconet device, all main line and loop blocks are detected including separate OS sections for each of the turnout interlockings.
There will be 9 power districts (only so that when a short is encountered in a town, the rest of the layout is not effected.) All this will be run from 1 x DCS100.
I will now set about installing the loconet aux devices on timber and pre wiring them with terminal blocks before I install the decks of the layout. Once ready I will install them before screwing down the decks that I have already cut. (to make the install easier!).
Stay tuned for the next update.
Sunday, 8 December 2013
Main deck and staging construction
Raisers and more raisers.
Now that I have decided that the LED lighting is not going to be bright enough for the layout and the only option is Fluro's, I now need to source enough fluro's to complete the layout.
As this is going to take a week or so, I decided that I would make a start on the main decks at North Creek and Plattsburgh and also the staging for the North and South ends.
Earlier this week I completed all the raisers at North Creek and Plattsburgh. Both of these towns dont have staging tracks below them so I knew I could make a start. During the week I completed the raisers and then today I completed the main decks at both towns as well as the majority of the deck for the North and South staging.. Now to complete the road beds from staging to the main deck of the layout some 300mm higher than staging.
Here are a few progress pictures.
Plattsburgh
Plattsburgh on the right and North Creek on the left
North Creek
North Creek from the other end
The end of North Staging
North Staging
North Staging
North Staging
Plattsburgh from the other end
Raisers ready for Willsboro (after I add the deck for the staging line below it)
South Staging
South staging
South staging
Thanks for visiting.
Monday, 2 December 2013
More on LED Strips for lighting
When is there enough light?
After my last post I managed to source LED strips that are in the 5000K to 5500K range and very agreeable to the eye.
Now I know the colour I want / need, the next key issue is much much light is enough light, ie what is the light reading from each of the
solutions such as Fluro's vs LED Light strips.
The key to this whole thing is a light meter. Where can I loan one from.. Then I did a search on the Apple Apps store and found a light meter app for my iPhone (for free!). YEY!..
While is may not be 100% accurate, it will be close and it does give me a relative reading for each solution.
So here is what I found:
The fluro's when tested at main deck level (being 1m from the fluro to the main deck) read out at on average 2,500 to 3,000 lux. (These are the cool white Fluro or 4000K)
The single strip of LED's when measured from the main deck to the bottom of the valance being 600mm read out at 400lux (These being the 5500K LED Strips that we will from now on call Pure white)
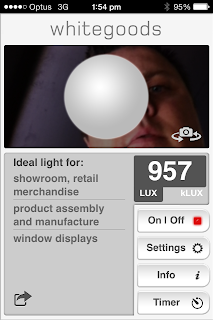
If I add all 3 strips of LED's (cool white, Pure white and warm white, remembering that the colour of the light is not the issue here but what I happen have have on hand) I get up to 950lux
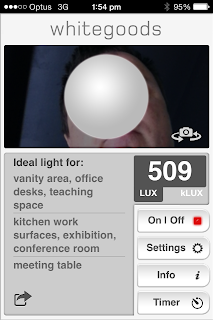
If I add the warm white and the pure white I get to 500 lux so OK for kitchen work and meeting table lighting.
If I add the cool white (read that as the blue 6500K one) and the pure white then I get to 600lux so about the same as the 2 above but more light.
The app recommends what the light level is suitable for.
With 3 rows of LED's it is enough for studio lighting at around 900 lux.
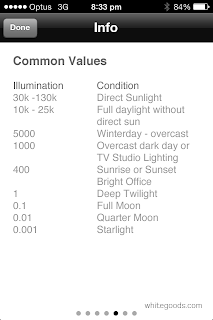
400 lux is about sunrise / sunset, and a bright office.
So if 3 rows of LED's are needed (all the same colour) then the hyp pocket is still happy as it is still cheaper than having to use just Fluro's
After my last post I managed to source LED strips that are in the 5000K to 5500K range and very agreeable to the eye.
After a discussion with a bunch of friends at an operating session recently re the LED's vs Fluro's I did some more
testing over the weekend.
The key to this whole thing is a light meter. Where can I loan one from.. Then I did a search on the Apple Apps store and found a light meter app for my iPhone (for free!). YEY!..
While is may not be 100% accurate, it will be close and it does give me a relative reading for each solution.
So here is what I found:
The fluro's when tested at main deck level (being 1m from the fluro to the main deck) read out at on average 2,500 to 3,000 lux. (These are the cool white Fluro or 4000K)
The single strip of LED's when measured from the main deck to the bottom of the valance being 600mm read out at 400lux (These being the 5500K LED Strips that we will from now on call Pure white)
If I add all 3 strips of LED's (cool white, Pure white and warm white, remembering that the colour of the light is not the issue here but what I happen have have on hand) I get up to 950lux
If I add the warm white and the pure white I get to 500 lux so OK for kitchen work and meeting table lighting.
If I add the cool white (read that as the blue 6500K one) and the pure white then I get to 600lux so about the same as the 2 above but more light.
The app recommends what the light level is suitable for.
Also see the pic with the common values.
Basically my fluro's are at about 3,000 lux or 3kLUX that is basically
daylightWith 3 rows of LED's it is enough for studio lighting at around 900 lux.
400 lux is about sunrise / sunset, and a bright office.
So the million dollar question is, how much light is enough?
I did my tests at the level that the main deck will be and not at the base
board level (as the light would be less at the 1100mm mark compared to the
1400mm level.)
I have now enlisted the help of a friend that has already used LEDs on his layout to do some light testing and see what he counts as acceptable light from the Iphone app.
So if 3 rows of LED's are needed (all the same colour) then the hyp pocket is still happy as it is still cheaper than having to use just Fluro's
3 rows of LED's is just under $500 where as 26 x 1.2m fluro's is $780 (@$26
each)
I will keep researching!...
Subscribe to:
Comments (Atom)
.JPG)
.JPG)
.JPG)
.JPG)
.JPG)
.JPG)
.JPG)
.JPG)
.JPG)
.JPG)
.JPG)

.JPG)
.JPG)
.JPG)
.JPG)
.JPG)
.JPG)
.JPG)
.JPG)
.JPG)
.JPG)
.JPG)
.JPG)
.JPG)


