Saturday 10 December 2016

Its been a while. Back to it

Back to the main lower deck.

After almost 6 months of no work on the layout, due to heavy work commitments, I managed to get back into the layout room last weekend to make progress on the lower deck.

I have also installed the drop down bridge across the door way for the lower deck.

See the below for progress pictures.


Its almost time to start laying track!..

Stay tuned for more updates over the summer..

Sunday 5 June 2016

Timber work and South Staging installed.

Boy I really enjoy laying track!

Well, it has been wet and cold this weekend, well not snowing like a US winter but cold enough for Melbourne.

I started off by completing the install of the bulk of the cross members around the peninsula and the Whitehall section of the layout. I also prepared the area for South staging.

Along the way I have made a few minor adjustments to the outline of the layout, mainly in the Whitehall area where the loco facility is going to be located. I decided not to narrow the layout down to 200mm and kept it to 300mm all the way along.

Here are a few pictures of the cross members installed.


During the day today, I also found the box that contains all the electronics from the old layout and spread them out so I can then see if any can be left on the boards from the old layout.


Then, the fun began! Its track laying time!

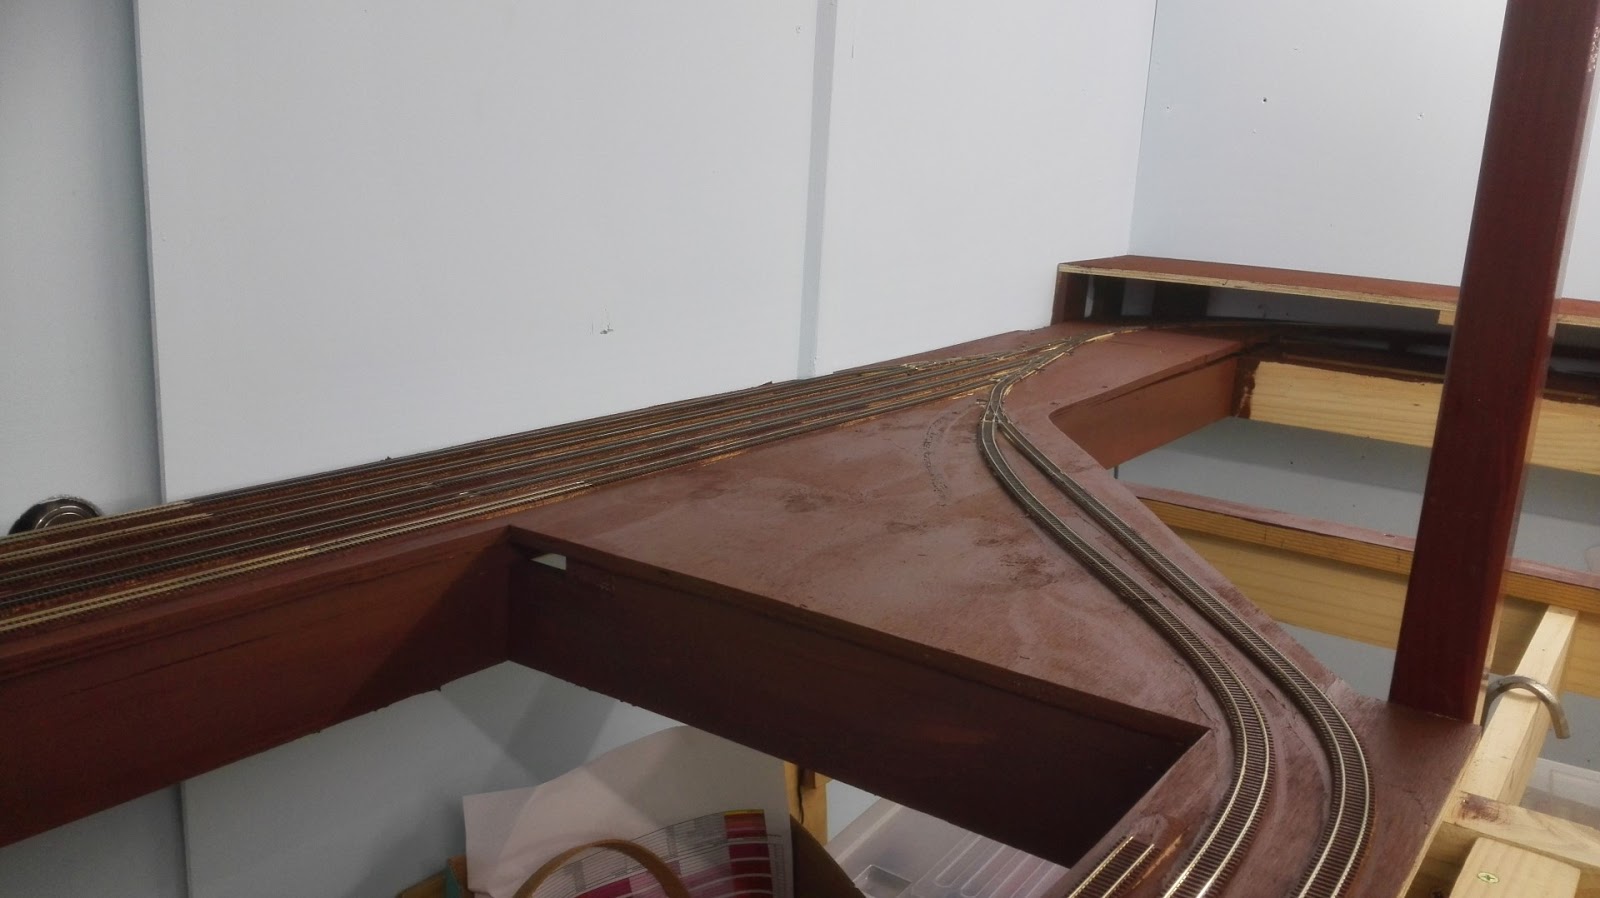
I installed the base 12mm ply for the staging section and also installed the main line out of staging up and along the wall. This is a 2% gradient from 1200mm (from the floor) up to 1300mm (from the floor) where the staging track will meet the line coming from the Fairhaven branch line. From there it will go over the drop bridge at the door way and onto Whitehall.

I usually use Atlas Code 55 flex track for my layouts. This one will be the same, however, as my track supplies were low, I managed to obtain from old Railcraft Code 55 flex and ME code 55 flex both weathered and un-weathered.
As I have never used Railcraft / ME before and wanted to ensure that the layout looks the same, so I decided to use the small stock of Railcraft and ME flex in the staging yards.

The first piece I picked up was the weathered ME Code 55 flex track.
Well, I have to say, I'm NOT a fan of the ME weathered flex. It is very difficult to manage / bend and or keep straight. So much so that I think that if I picked up this ME weathered flex as a beginner I would seriously think about going to set track!. Fortunately, I am familiar with Atlas Code 55 flex and I only had about 4 lengths of the weathered track so I only used it on the straight sections. The ME un-weathered flex is much easier to use, but, still not as good (in my opinion) as the Atlas Code 55.

During the install process I made a few changes on the fly and added an extra return loop in staging. So now I have 2 tracks that are return loops and 3 that are dead ends. 2 of the dead end tracks are not long enough for a full size 2 loco's 20 cars and a caboose, but thats ok as I will have some shorter trains including a pass so wont be an issue. I have also made the same changes to the North or Upper staging section as well so the layout wont get unbalanced by different size staging yards at each end.

As you can see in the pictures, I even managed to get a train out of their boxes and place it on the track and test the track work (by hand not with the loco's) to ensure everything ran smoothly.
The turnouts all need to have MP1 turnout machines installed to ensure that they are held in position.

Here are a few pictures of the completed south staging.


After the track work was completed I dug out a box of wire from the old layout and sorted out the mess. I then laid out the longer lengths that I will use as the track power bus and the DC power bus.

I will again use a DCS100 plus a DB100+ booster for the layout.. The DB100 is probably over kill, however, as I have it, I may as well install it to spread the load.


Next I will install the main power bus and power up the south staging tracks to I can test the MP1 turnout machine and the track. Stay tuned.

Monday 30 May 2016

Basic frame complete

Lower level basic framing work completed.

Per the pictures below, I have now completed the basic framing for the layout for the main or lower level of the layout.

You may notice that the left isle looks to be wider than the one on the right. No it is not an optical illusion. In the case of the centre peninsula I wanted to use long timber to form the L girder and as the helix access area extends in 100mm into the space where the L girder would normally run from the far wall, I decided to just make the main centre sub structure 100mm narrower to account for this. Also, as the main yard at Whitehall near the loco facility narrows to 200mm, I made this substructure 100mm narrower also. Therefore the isle is 200mm wider than what the final layout will be.

I have added 2 pairs of legs along the peninsula at present with a single leg down the far end to support both the helix space and also to give some strength to the roof in this space as it is not attached or supported by the far wall. The brown painted leg  / post will be hidden in the staging / helix area and wont be seen.

Once I get the main level together I will most likely move or widen the legs on the end of the peninsula to give it more stability. If I can manage it, I will also hide a leg / post that will run from floor to ceiling in the 1 turn helix in the same area to just give the layout stability and also to add extra support to the ceiling. (not that it needs it, I tend to over engineer stuff at times just to be sure.!)


Due to the lack of storage compared to the hold shed / house, I am going to need to store some tools etc in the layout room.. At present the spare timber is being stored in the room along with some plastic 27L tubs with tools and layout supplies in them. Not ideal , but some times necessity takes over. The triton will also most likely be stored where it stands in the pictures when not in use.. Needless to say, it will need to be cleaned after each use before it goes back into storage.

Wednesday 25 May 2016

Painting completed

The end of the painting (for now)

This evening I masked up and painted the workshop / garage side of the wall that I built.

Here are a few quick pics of the workshop side..


Again, I just used paint I have on hand, however, this grey (or Windspray as it is called) could easily double up for the Greg on the D&H lightning stripe scheme..

Now all I need is a nice big D&H herald to go on the wall. Or do I dare go Blue with a yellow lightning stripe??

Now it is time to get started on the base of the layout and then once that is installed then get more lights into the room.

Stay tuned.

Tuesday 24 May 2016

Room painting complete

Jobs done..

Just a short sharp update.
The room painting is now complete..

At present it is blue (levent) on the ceiling and walls. Once the main L girder goes onto the wall I will then paint the lower section dark grey / almost black (monument) like I had in the last room.
Then over time, once I get the valance installed then the valance and the isle way ceiling will also be monument.

The door is from the old shed / railway room and still has the black at the bottom.

The blue is fairly over powering at present but wont be an issue once the black is added.


Now I need to complete the painting on the outside of the room and then it is layout build time.

Stay tuned.

Monday 23 May 2016

Wall painting complete

Walls done..

Last night after my quick update I got stuck into painting..
4 litres later, the walls now all have 2 or 3 coats and the ceiling has 1 coat of paint.. Then I ran out of paint.. (as expected)..

Here are a few progress pictures.


Yes the back corner brick looks odd.. However, it will be covered by the hidden staging and helix section of the layout..
Now to get some more paint to finish the ceiling.

Stay tuned.

Sunday 22 May 2016

Room build complete

Tools down, the room build is complete..

No time to mess around on the computer to do updates.. The room build was completed on Friday..
Now Michelle's chores are done its time to paint..


Have found the 4 litre tub of Levent blue.. and off to bunnings to get a roller tray and its painting time..

Stay tuned.

Wednesday 18 May 2016

More railway room build progress

No point standing around.

As I have all the materials I need, I was able to get cracking over the last 3 days and have now installed the ceiling, moved the fluro light from the garage ceiling to inside the railway room and have installed 70% of the sheets on the walls.
I was able to install the sheets in such a way so that the holes for the screws in the sheets from the old shed are not going to be in the view of the new layout. (well 99% of them anyway.)

The other task completed today was a sheet of heavy duty plastic was installed on the ceiling or cut out section under and near the roller door. While the door will rarely get direct rain as it is facing east, it will still get wet. So the intention of the thick black plastic is that if / when the door gets wet and is operated, then the drips will fall on the plastic and then run down the outer wall rather than pool and come through the ceiling above the layout.

The first 3 pictures are the ceiling progress


The following are the progress of the walls.


Now I just need to install a few narrow pieces around the door way, a sheet against the brick work and the lower 2 sheets.

Then it will be painting time.

Stay tuned...

Sunday 15 May 2016

Let the construction begin!

Time to cut some timber!.

Now that winter is approaching and it is getting cold and the rain is coming, the front garden is complete, the 40m long x 1m high retaining wall is complete, the side access drive is complete its time to get going on the railway room build.

As I have most of the materials thanks to the deconstruction of the old railway room at the old house, it has been fairly cost effective to get going.
Over last weekend, a bit during this week and a bit more time this weekend, I have been able to complete the frame of the railway room within the garage.

The garage is 6m x 6m and the railway room will take up 6m x 2.95m (less a bit of space to enable the roller door to function).

I have now installed the front wall next to the roller door and the main dividing wall in the middle of the garage. I also needed to find space out of the way for the work bench so I built that into the wall as well so that when it is folded down, it is out of the way and will still enable 3m wide clear access for the car. This workbench is now in its 3rd home as it was at the last 2 houses.. Hopefully this will be the last move for it and I for some time.!...

You will note that the garage is fairly full of materials such as 6mm MDF, 3mm MDF, 9mm ply etc, so it has been an exercise in moving stuff around to enable access and build room and slow use up the materials within the space I have that is also storage for it.

Here are a few progress pictures:


Now that the false ceiling is all but done, now I just need to get the MDF on the walls and the 9mm ply on the ceiling.. Then it is painting time!.

The back brick wall will be in the area of the hidden staging and helix so the door will no longer be used and the brick wall will remain as is as it wont be seen..

Here is the current plan..
Not much has changed. Just a bit of tweaking..

Lower staging
 Main deck and heilx
 Upper deck


Till next time.. Stay tuned.